R-CNN算法
本文共 1386 字,大约阅读时间需要 4 分钟。
R-CNN算法可以说是利用深度学习进行目标检测的开山之作。2012年AlexNet网络在ImageNet LSVRC中效果显著,因此R-CNN的作者想要尝试将AlexNet在图像分类上的能力迁移到PASCAL VOC的目标检测上。这就要解决两个问题:
- 如何利用卷积网络去进行目标定位;
- 如何在小规模的数据集上训练出较好的网络模型。
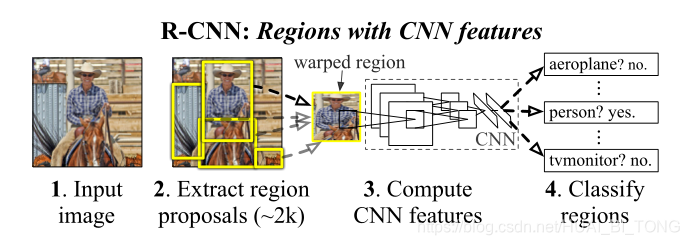
对于利用卷积网络去进行目标定位的问题,R-CNN利用候选区域(Region Proposal)的方法,这也是该网络被称为R-CNN的原因:Regions with CNN features。对于小规模数据集的问题,R-CNN使用了微调的方法,利用AlexNet网络在ImageNet上预训练好的模型。
R-CNN算法步骤:
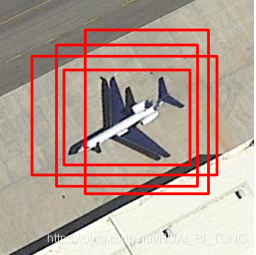
- 输入一张图像生成1K~2K个候选区域(使用Selective Search方法);
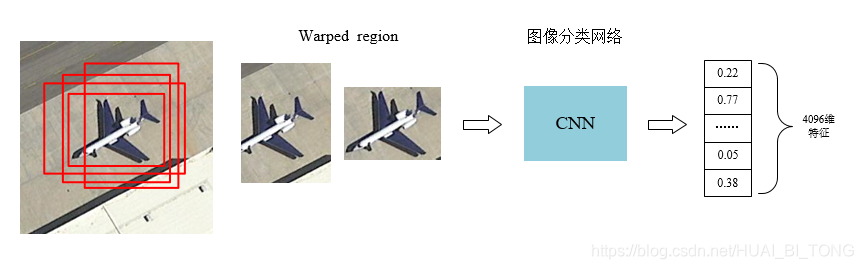
- 对于每个候选区域,使用深度网络提取特征(CNN);
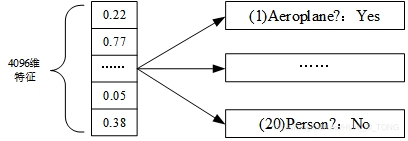
- 提取的特征送入每一类的SVM分类器,判别是否属于该类(SVM);
- 使用回归器精细修正候选框的位置(Regression)。
 step4:使用回归器精细修正候选框位置 对NMS处理后剩余的候选框进一步筛选。接着分别用20个回归器对上述20个类别中剩余的候选框进行回归操作,最终得到每个类别的修正后的得分最高的bounding box。 如图,黄色框口 P P P表示建议框Region Proposal,绿色窗口 G G G表示实际框Ground Truth,红色窗口 G ^ \hat{G} G^表示Region Proposal进行回归后的预测窗口,可以用最小二乘法解决的线性回归问题。
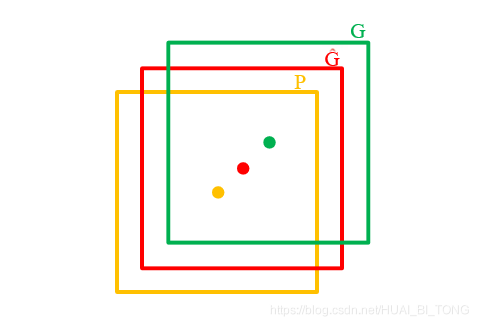
- 测试速度慢:测试一张图片约53s (CPU)。用Selective Search算法提取候选框用时约2秒,一张图像内候选框之间存在大量重叠,提取特征操作冗余。
- 训练速度慢:过程极其繁琐。
- 训练所需空间大:对于SVM和bbox回归训练,需要从每个图像中的每个目标候选框提取特征,并写入磁盘。对于非常深的网络,如VGG16,从VOCO7训练集上的5k图像上捉取的特征需要数百GB的存储空间。
- SVM分类器和边框回归器的训练过程,和CNN提取特征的过程是分开的,并不能进行特征的学些更新。
转载地址:http://tqfvz.baihongyu.com/
你可能感兴趣的文章
Mysql 纵表转换为横表
查看>>
mysql 编译安装 window篇
查看>>
mysql 网络目录_联机目录数据库
查看>>
MySQL 聚簇索引&&二级索引&&辅助索引
查看>>
Mysql 脏页 脏读 脏数据
查看>>
mysql 自增id和UUID做主键性能分析,及最优方案
查看>>
Mysql 自定义函数
查看>>
mysql 行转列 列转行
查看>>
Mysql 表分区
查看>>
mysql 表的操作
查看>>
mysql 视图,视图更新删除
查看>>
MySQL 触发器
查看>>
mysql 让所有IP访问数据库
查看>>
mysql 记录的增删改查
查看>>
MySQL 设置数据库的隔离级别
查看>>
MySQL 证明为什么用limit时,offset很大会影响性能
查看>>
Mysql 语句操作索引SQL语句
查看>>
MySQL 误操作后数据恢复(update,delete忘加where条件)
查看>>
MySQL 调优/优化的 101 个建议!
查看>>
mysql 转义字符用法_MySql 转义字符的使用说明
查看>>